WARNING: The following job steps cannot be reached with the current job step flow logic

Problem

When I try to add a step to an existing SQL Server agent job, a warning message shows up:

WARNING: The following job steps cannot be reached with the current job step flow logic:
        [1] test0
 Is this the intended behavior?


Solution

Click "No" on the warning window, then double check the value in the "Start step" in the "Job Properties" window. In my case, although I have moved the new created step "test0" to the top of the "Job step list", the Start step is still "test1". Changing it to "test0" fixed the issue.

Unable to Delete SQL Server Maintenance Plan and SQL Server Agent Job

Problem

I have encountered an error recently when I was doing some test to build a maintenance plan in SSMS. I tried to delete a maintenance plan which I did not need any more, an error showed up:

Exception has been thrown by the target of an invocation. (mscorlib)
Additional information:
Index was out of range. Must be non-negative and less than the size of the collection. Parameter name: index (mscorlib).


When I tried to delete the SQL Server Agent job related to this maintenance plan, this error showed up:

Drop failed for Job "Database Maintenance.Subplan_1". (Microsoft.SqlServer.Smo)
Additional Information:
An exception occurred while executing a Transact-SQL statement or batch.
(Microsoft.SqlServer.ConnectionInfo)
The DELETE statement conflicted with the REFERENCE constraint "FK_subplan_job_id". The conflict occurred in database "msdb", table "dbo.sysmaintplan_subplans", column 'job_id'.
The statement has been terminated. (Microsoft SQL Server, Error: 547)


Solution

We will have to remove the data entries of the jobs and  plans manually from "msdb" system database.
The following is the steps to be taken:

Step 1. find the job_id for the job

use this query to get the job_id:
use msdb
go
select job_id from sysjobs where name = 'yourjobname'

Replace yourjobname with your SQL Server Agent job name shown in SSMS. In my case, it is 'Database Maintenance.Subplan_1'.

Step 2. find the plan_id

use this query to get the plan_id
use msdb
go
select plan_id from dbo.sysmaintplan_subplans
where job_id ='yourjobid'

Replace 'yourjobid' with the job_id obtained from Step 1.

Step 3. delete the data entries of the jobs and plans

Use these queries to delete the records:
use msdb
go
delete from [dbo].[sysjobschedules] where job_id = 'yourjobid'
go
delete from [dbo].[sysmaintplan_log] where plan_id = 'yourplanid'
go
delete from [dbo].[sysmaintplan_subplans] where job_id = 'yourjobid'
go
delete from sysjobs where job_id = 'yourjobid'


Step 4. delete the maintenance plan package

Connect SSMS to Integrated Service.


The expand "Stored Packages" -- "MSDB" --- "Maintenance Plans", right click on the maintenance plan, and select "Delete" from the right click menu.


IFTTT Applet - Save Home Depot Electronic Receipt PDF to Google Drive Automatically

Home Depot provides a cool service for customers: sending electronic receipts by email.

It really helps me to manage the receipts. I am not good at keeping paper receipts, often lost them or put them in a place hard to find. The receipts are sent to customers as a PDF attachment of the email.
At first, I organize the receipts manually, adding a star or adding a label. After a while, I setup a filter to add a label "HomeDepotReceipt" to all the receipts automatically. Then I think it will be better to save all the receipt in one single folder in google drive.

IFTTT is a perfect tool to implement it. IFTTT stands for IF "This" Then "That". It is a free platform to automate your digital life, including email, social medias, cloud storage and devices etc. This tutorial will explain how to setup a IFTTT applets to save receipt PDF to google drive.

Step 1. Register IFTTT, connect Gmail and Google Drive

First, you will need to sign up an account with IFTTT if you don't have one.


Then search for "Gmail" service and "Connect", and search for "Google Drive" service and "Connect".


Step 2. Create a Filter for Home Depot Electronic Receipt in Gmail

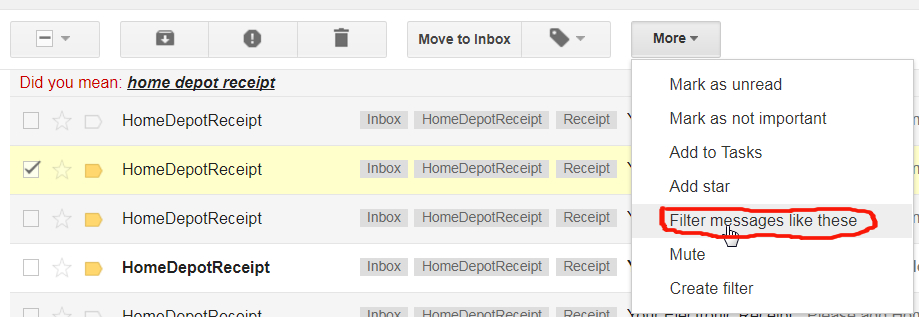
Open Gmail, Check the checkbox next to the email with Home Depot electronic receipt, click "More", and "Filter messages like these". 

Then click "Create filter with this search".


check the checkbox next to "Apply the label", then select "New label" from the pull down menu on the right of "Apply the label".


Input a new label name, for example, "Homedepotreceipt", then select "Create" to create the label, click "Create filter" to create the filter.

The new created filter will assign label "Homedepotreceipt" to all the electronic receipts from Home Depot.

Step 3. Create the IFTTT Applet

Login to IFTTT.com, select "My Applets", then "New Applet". 


Select "This" from the New Applet window. 
Select "Gmail" service.


Select "New email in inbox labeled" trigger.


Input the label name, for example "Homedepotreceipt", then select "Create trigger".


Select "That", then select "Google Drive" as action service.

Select "Upload file from URL" as action, you can customize the path on your google drive to suit your needs, then click "Create Action" on the next screen.


The last step is to select "Finish" to complete the setup of the Applet. 
Next time when you receive an electronic receipt by email from Home Depot, the PDF will save to your google drive automatically.


Troubleshooting for Failed Maintenance Plan Reorganize Index Task

Problem

I have setup a scheduled maintenance plan for a server, to do basic maintenance tasks such as checking database integrity, reorganizing index and cleaning up history. It shows "failed" in job history.


Solution

1. Check the error log

The error log doesn' t provide enough information for trouble shooting:
"DBA Maintenance Plan.Subplan_1,Error,,ServerName,DBA Maintenance Plan.Subplan_1,,,The job failed. The Job was invoked by Schedule 17 (DBA Maintenance Plan.Subplan_1). The last step to run was step 1 (Subplan_1).,00:41:08,0,0,,,,0"

2. Revise Maintenance Plan to Enable "Send report to an email recipient"

Start SSMS, double click the maintenance plan, then click the "Reporting and Logging" icon, then check the button on the left of "Send report to an email recipient", and add an Agent operator.


Running the maintenance plan again will generate an email report. In my case, the report includes the following error message:
"Reorganize Index Task (servername)
Reorganize index on Local server connection
Databases that have a compatibility level of 70 (SQL Server version 7.0) will be skipped.
Databases: All user databases
Object: Tables and views
Compact large objects
Task start: 2017-09-03T10:32:03.
Task end: 2017-09-03T10:33:58.
Failed:(-1073548784) Executing the query "ALTER INDEX [Indexname" failed with the following error: "The index "Indexname" (partition 1) on table "tablename" cannot be reorganized because page level locking is disabled.". Possible failure reasons: Problems with the query, "ResultSet" property not set correctly, parameters not set correctly, or connection not established correctly."

3. Find the Table and Index across All Databases on the Server & Change Index Property

The above error message lists the name of the table and index name, but not the database name. We can use this query to determine which database they belong to:
sp_MSforeachdb 'SELECT "?" AS DB, * FROM [?].sys.tables WHERE name like ''tablename'''
Then we can use SSMS to modify the index property, change "Allow page locks" from "False" to "True".
Run the maintenance plan again, and there is no error anymore.

Trouble Shooting for "No global profile is configured"

Problem

A weekly maintenance plan failed this weekend. I checked the history of the maintenance job, and found the following error message:
01/29/2017 21:13:00, MaintenancePlan.Sundays, Error,, SQL001, MaintenancePlan.Sundays,,, The job failed.  The Job was invoked by Schedule 39 (! DBA - MaintenancePlan.Sundays).  The last step to run was step 1 (Sundays).,00:00:04,0,0,,,,0
01/29/2017 21:13:00, MaintenancePlan.Sundays, Error,1, SQL001, MaintenancePlan.Sundays, Sundays,, Executed as user: NT Service\SQLSERVERAGENT. Microsoft (R) SQL Server Execute Package Utility  Version 12.0.5000.0 for 64-bit  Copyright (C) Microsoft Corporation. All rights reserved.    Started:  9:13:00 PM  Progress: 2017-01-29 21:13:01.80     Source: {06474EBF-18F1-49F5-960B-B11B5686CA69}      Executing query "DECLARE @Guid UNIQUEIDENTIFIER      EXECUTE msdb..sp...".: 100% complete  End Progress  Error: 2017-01-29 21:13:02.40     Code: 0xC002F210     Source: Notify Operator Task Execute SQL Task     Description: Executing the query "EXECUTE msdb.dbo.sp_notify_operator @name=N'The DB..." failed with the following error: "No global profile is configured. Specify a profile name in the @profile_name parameter.". Possible failure reasons: Problems with the query "ResultSet" property not set correctly parameters not set correctly or connection not established correctly.  End Error  Warning: 2017-01-29 21:13:02.40     Code: 0x80019002     Source: Sundays      Description: SSIS Warning Code DTS_W_MAXIMUMERRORCOUNTREACHED.  The Execution method succeeded but the number of errors raised (1) reached the maximum allowed (1); resulting in failure. This occurs when the number of errors reaches the number specified in MaximumErrorCount. Change the MaximumErrorCount or fix the errors.  End Warning  DTExec: The package execution returned DTSER_FAILURE (1).  Started:  9:13:00 PM  Finished: 9:13:02 PM  Elapsed:  2.464 seconds.  The package execution failed.  The step failed.,00:00:04,0,0,,,,0

Solution

The reason is that the database mail profile we have configured, is not the global/default any more. Change the profile to "Default" will fix the problem.
Steps:
1. Right click Database Mail, select Configure Database Mail from the right-click menu.

2. Select Next on the Database Mail Configuration Wizard window.
3. Select Manage profile security in the window.

4. Select Yes, then Next in the Default Profile field.

5. Select Finish to complete the configuration in the next window

Trouble Shooting for Error 8152 and Error 3621

Problem

We have an ETL job which failed recently, an alert was sent to us:
SQL Server Job System: 'XXX-XXXXX' completed on \\SQL001
JOB RUN:            'XXX-XXXXX' was run on 1/1/2017 at 0:00:00 PM
DURATION:         0 hours, 3 minutes, 37 seconds
STATUS:               Failed
MESSAGES:         The job failed.  The Job was invoked by Schedule XX (Night).  The last step to run was step 1 (EXECUTE [DBXXXXX].[dbo].[SPXXX]).

Solution

Start SSMS, expand SQL Server Agent - Jobs, right click on the job 'XXX-XXXXX', select "View History" from the right-click menu.
This error message can be found in the log:
"START:[Table001] [SQLSTATE 01000] (Message 50000)  String or binary data would be truncated. [SQLSTATE 22001] (Error 8152)  The statement has been terminated. [SQLSTATE 01000] (Error 3621).  The step failed.,02:06:11,16,3621,,,,0"
This error is usually caused by the inserting data (VARCHAR or CHAR data type) is longer than the length of the column in the destination table. In our case, this statement in SP [DBXXXXX].[dbo].[SPXXX] caused the problem:
INSERT INTO [DBXXXXX].[dbo].[Table001]
(
[column1],[column2],[column3]...
)
(
SELECT 
[column1],[column2],[column3]...
from [SQL002].[DBYYYYY].[dbo].[Table001]
where identity_column > @V1
The length of columnA in destination table is 20, is 2 in source table. The solution is to change the length of columnA  in destination to 20. Then the job ran successfully.

Troubleshooting for "Login failed for user 'domainname\computername$'

Problem

I have received an email alert from a server:
Title: SQL Server Alert System: 'computername - Sev:014 - INSUFFICIENT PERMISSIONS' occurred on \\computername
DESCRIPTION:    Login failed for user 'domainname\computername$'. Reason: Could not find a login matching the name provided. [CLIENT: <local machine>]
The error message in the error log:
Login failed for user 'domainname\computername'. Reason: Could not find a login matching the name provided. [CLIENT: <local machine>]
Error: 18456   Severity: 14   State: 5.

Solution

My first step is to check the Event log on the server:
The actual user is Network Service. The Network Service account is a built-in account that has more access to resources and objects than members of the Users group. Services that run as the Network Service account access network resources by using the credentials of the computer account in the format domainname\computername$. The actual name of the account is NT AUTHORITY\NETWORK SERVICE.
In my case, adding computer account domainname\computername$ into the SQL Server instance solved the issue. Another option is to add the NT AUTHORITY\NETWORK SERVICE into SQL Server instance.

Patching SQL Server 2014 Failover Instance

We have a SQL Server 2014 failover instance need to patched. The failover instance include 2 nodes -- SQL001 (active) & SQL002(passive), the build before patching is RTM with no service pack and cumulative update installed. The patch is cumulative update 14 for RTM.

Install CU 14 on SQL Server 2014 Failover Instance

Step 1. Install CU 14 on passive node (SQL002)

We will install CU 14 on the passive node first.
  1. Login to the passive node SQL002, run "SQLServer2014-KB3158271-x64.exe" to install CU 14.                                                              
  2. Accept  License Terms
  3. Select the features to be installed.
  4. Select "Next" when files in use check completed.
  5. Select "Update" to start installation.
  6. Select "Close" when installation completed.

Step 2 Manually Failover

In order to patch SQL001, we will manually failover to SQL002, and make SQL001 passive node.
  1. From Server Manager, select "Tools" -- "Failober Cluster Manager".
  2. Select the cluster name in Failober Cluster Manager, then click "Roles" -- "SQL Server (MSSQLSERVER)", select "Move" -- "Select Node..." in Action panel.
  3. Select SQL002 in the Move Clustered Role window.
  4. In Roles panel, the Owner Node will change to "SQL002", the Status change to "Pending".
  5. The failover is completed when the Status change to "Running".

Step 3 Install CU 14 on SQL001

  1. Install CU 14 on SQL001 follow the procedure in Step 1.
  2. After installation completed, manually failover to SQL001. The installation completed.

Reference

Troubleshooting for "The transaction log for database 'database1' is full due to 'REPLICATION'"

Problem

I have a dev/test server B on which one database [database1] was restored from the same name database on production server A. [database1] on server A is the published database in a transnational replication. The recovery mode is simple for [database1] on both servers.
Recently I have received an alert from server B:
"Title: SQL Server Alert System: 'server B - Sev:017 - INNSUFIFIENT RESOURCES' occurred on \\server B
DESCRIPTION:   The transaction log for database 'database1' is full due to 'REPLICATION'."

Solution

First I checked the transaction log file size and available disk space, the log is 200GB, and the drive is almost full. The recovery mode of [database1] is simple, which means the transaction log should be truncated automatically.  However, some factors may delay the truction, they are explained in the online book:                           https://msdn.microsoft.com/en-CA/library/ms190925.aspx#FactorsThatDelayTruncation
Run this script (script1) to get the factor:
SELECT [name]
,[database_id]
,[log_reuse_wait_desc]
FROM [sys].[databases]
where name = 'database1'
The result is
The factor delayed the truncation is REPLICATION. But there is no replication setup on this server at all. I verified that by running this script:
SELECT [is_published]
,[is_subscribed]
,[is_cdc_enabled]
FROM [sys].[databases]
where name = 'database1'
Then I checked the transaction log file usage by running the command: "DBCC SQLPERF(logspace)". The result of "log Space Used(%)" is more than 99%, which means it can't be shrunk to a reasonable size.
I tried stored procedure sp_removedbreplication:  
exec sp_removedbreplication 'database1'
It did not remove the replication flag on database. Restoring from a published database may just bring partial information of the replication, enough for SQL Server not to truncate the tranction log, not enough for sp_removedbreplication to find and remove it.
So the solution is to add the database to publication, then remove it. Right click Replication in SSMS, then click Publisher Properties. Click Publication Databases in the Publisher Properties window, and check the Transactional button besides [database1], then OK.
Ran script1 again and found the value of [log_reuse_wait_desc] changed to "NOTHING", which means nothing will delay the truncation of transaction log. Ran "DBCC SQLPERF(logspace)" again, "log Space Used(%)" is 0.09. Then you can just shrink the transaction log file and solve the problem. The last step is to go back to Publisher Properties, and uncheck the Transactional button besides [database1].

Downgrade SQL Server 2012 from Standard Edition to Developer Edition

Problem

We have several dev/test servers with SQL Server 2012 Standard edition installed. Since Developer edition is free for development/test environment, so it make sense to downgrade to Developer edition. Unfortunately, Microsoft does not provided a direct method to do it. According to Microsoft online book: https://msdn.microsoft.com/en-us/library/ms143393(v=sql.110).aspx, it is easy to upgrade from cheaper edition to expensive edition, not the other way around.

Solution

We will have to uninstall SQL Server 2012 Standard edition, then install Developer edition. But before doing that, we can backup the system databases, then migrate them later into the new installation.
Steps
  1. Preparation: check the instance properties and system database properties, take a screenshot of the root directory and database default locations.
  2. Run  SQL Server 2012 Configuration Manager, take a screenshot of accounts used by SQL Server services, then stop the services.
  3. Copy system databases (master, model, msdb) and ReportServer database to a new folder.
  4. Uninstall SQL Server 2012 Standard edition.
  5. Install SQL Server 2012 Developer edition, set the root directory and database default locations the same as the previous installation. Make sure the patch level is the same as before.
  6. Run SQL Server 2012 Configuration Manager, stop SQL Server services.
  7. Copy the system databases (master, model, msdb) and ReportServer database from the backup folder to the current installation folder.
  8. Restart SQL Server services.

Send SMS Notification When You Receive an Important Office 365 Email

Problem

In order to monitor our databases servers, many email alerts have been setup in SQL Server to help us know what's happening on the server. It is really helpful for the monitoring and trouble shooting for the database servers. However, it causes the flood of email to my index. Some email alerts need my immediate attention, for example a production is in critical condition, need me to fix it right away. I may miss it just because I cannot read so many email and tell this one is much more important than the others.

Solution

There are several methods to setup special notifications for important office 365 emails:
Method 1. iPhone VIP email alerts.
The iOS email client allow users to add some contacts (for example your boss) as VIP senders, therefore receive VIP email notifications when an email from VIP sender enters the inbox. My cell phone is an Android phone, so this method does not work for me.
Method 2. Office 365 Email Text Message feature
Office 365 email support text message, which can be easily setup:


Limitations: it only support Bell and Telus in Canada. Since I am with Rogers, neither does this method work for me.

Method 3. Email to Text Feature (Cell Phone Carriers) and Office 365 Email Index Rules
Most cell phone carriers provide email to text feature, which can send you a text message once an email was sent to your phone's email inbox. I am with Rogers, my phone's email address is 10digitphonenumber@pcs.rogers.com. This is how I setup my SMS notifications:
  1. Add 10digitphonenumber@pcs.rogers.com as a contact in Office 365
  2. Create an inbox rule in Office 365 to forward important emails to 10digitphonenumber@pcs.rogers.com
You will get a SMS every time you have received an important email.